 Cheevotron
Console guide
Game Bub
Earn achievements with your original Game Boy Advance, Game Boy and Game Boy Color cartridges on the Game Bub, the open-source FPGA handheld by Second Bedroom. Cheevotron's firmware sends the game's memory to your phone over Bluetooth, and each unlock pops up on the Game Bub's screen. For an overview, see Achievements for GBA and Game Boy cartridges on the Game Bub.
Works now. Real GBA and Game Boy cartridges play on our Game Bub, the phone recognises them, and unlocks pop up on the Game Bub. We can't test every cartridge. If one of yours doesn't work, write to hello (at) cheevotron (dot) com with the game's name and region.
What you need
- A Game Bub with a microSD card inside.
- Your cartridges: Game Boy Advance, Game Boy or Game Boy Color. Backups you made of your own cartridges work too, on the microSD card or on an EverDrive GBA flash cart.
- An Android phone (Android 9 or newer) or an iPhone with the Cheevotron app and Bluetooth.
- A USB-C data cable, to install the firmware and its updates: between an Android phone and the Game Bub, or between a computer with Chrome or Edge and the Game Bub.
Installing the firmware
- Switch the Game Bub on, leave it in its main menu and connect it to the phone with the USB-C cable.
- In the app on an Android phone, open Settings › Game Bub and choose Install or update Cheevotron under Firmware (the button names the version). Android may ask once or twice to allow access to the Game Bub: allow it.
- The Game Bub restarts for writing (its screen stays dark meanwhile), gets Cheevotron's firmware, starts it, and receives the FPGA designs for GBA and Game Boy on its microSD card. The whole install takes about a minute.
- When the app says it's done, unplug the cable.
The Game Bub's own boot loader, updater and settings are never touched.
With an iPhone, install the firmware from a computer on the setup page instead: an iPhone can't reach the Game Bub's USB chips.
Pairing and playing
- Switch the Game Bub on. In the app, open Settings › Game Bub and choose Pair over Bluetooth (on iPhone: Settings › Pair a console). From then on, the two find each other by themselves whenever the Game Bub is on.
- Insert a cartridge and pick Run Cartridge on the Game Bub.
- The phone loads the game's achievements and follows along. Each unlock shows in the app and over the game on the Game Bub.
The first time you run a cartridge, the Game Bub reads it completely to recognise it: about a minute for a big GBA game, with a progress bar on its screen. It remembers the cartridge on the microSD card, so from then on the game starts right away.
On the Game Bub
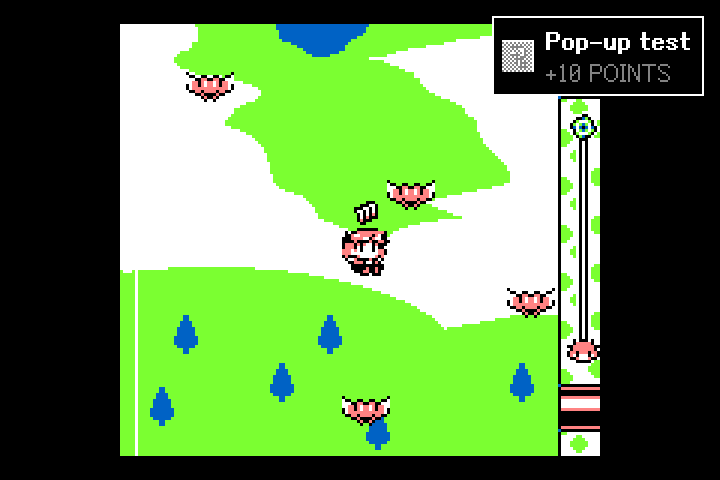
- Unlocks on the Game Bub: each unlock over the game for a few seconds, as a toast with badge, title and points, or as the badge alone. Choose the style and a spot the game leaves free in Settings › Game Bub, and try it with Show a test pop-up on the Game Bub.
- Chime on the Game Bub: a short chime in the game's sound with each pop-up. The Game Bub's volume sets how loud. Quiet phone while the Game Bub chimes keeps the phone quiet meanwhile.
- Progress on the Game Bub: steps toward an achievement, like 3/16, show as a small line over the game for two seconds, without a chime.
- Ready message: once connected, the Game Bub's screen shows the game and your progress, so the phone can stay in your pocket.
- Achievement list: press Home during a game and open Achievements to see what you've unlocked and what's left.
- LCD grid: in the Game Bub's own settings (General › LCD Grid), Cheevotron's FPGA designs can draw a subtle, light or medium grid over the picture, like the pixels of the original screens.
- Night light and extra dim: Night Light in the game menu (Home) or under General in the settings lays a warm tint over the game. For a screen darker than the lowest brightness, keep pressing Home + Volume Down once the brightness is at its lowest.
- Sleep: press the power button and choose Sleep; the power button wakes the Game Bub again.
- On a TV: in the Game Bub's Dock the picture is 720p. For a TV or scaler that doesn't show 720p, choose 480p under Settings › Dock › TV Resolution.
Saves
Cheevotron only reads the cartridge. For Game Boy cartridges, the Game Bub reads the save memory once before the game starts and keeps a copy in its FPGA that follows every change the game makes, so achievement sets that read the save work too. The game keeps saving to the cartridge as usual.
Going back to the original firmware
Connect the Game Bub to an Android phone as for the install and choose Restore the original firmware… in Settings › Game Bub, or use the setup page on a computer. The app removes Cheevotron's FPGA designs from the microSD card and writes Second Bedroom's original firmware back. That is the version the app carries (1.0.3), not a backup of your Game Bub: the app doesn't read the firmware that was on it. It takes about a minute. Install Cheevotron again whenever you like.
If something goes wrong
- Don't unplug during a write. The app never stops a write halfway on its own.
- A write was interrupted (loose cable, empty battery): connect the Game Bub and run the same action again. When the firmware doesn't start, the app writes through the Game Bub's chip directly. If even that doesn't show up, Second Bedroom's own updater (hold Volume Down while switching the Game Bub on) takes their firmware from a computer.
- The app doesn't find the Game Bub: check that it's switched on, try another cable, and allow access when Android asks.
- A cartridge isn't recognised: clean its contacts and run it again. The Game Bub reads each part of the cartridge twice and refuses a read that doesn't match.
Settings › Diagnostics keeps a log you can share if you need help.
Last updated November 20, 2026. Something unclear or wrong? Tell us at hello (at) cheevotron (dot) com and we'll fix the page.